In this article, we will explore how to configure the IgniteNet MetrolinQ to establish a wireless point-to-point connection. To begin, you will need the following device: ML2.5-60-BF-18. You can also use a single ML-60-10G-360 as the primary access point. (The setup remains the same) This device can be powered using both DC (which is included in the box) and Power over Ethernet (PoE). It boasts an impressive aggregate throughput of 2.5Gbps and covers an area of 120°. Including a single ML-60-10G-360 allows full 360° coverage, and the ability to create a high performing point to multi-point system.
Let's Get Started:
Initial Configuration:
These devices come with DHCP enabled by default, featuring a fallback address of 192.168.1.20. If you connect the device directly to your computer, you should be able to access it by entering 192.168.1.20 into your browser's address bar. However, if you are connecting through a switch, the IP address will be a randomly assigned available IP. In this case, check your switch table for the correct IP address.

Here are the default login credentials for these devices:
Username: root
Password: admin123
 Upon your first login, you will see a setup screen. Make sure to select New Zealand as your country. For local configuration, choose ‘No’ for cloud configuration and leave it set to ‘Yes’.
Upgrading Firmware:
Initially I recommend updating the firmware first. To ensure you see all the same settings as me.
The latest firmware can be downloaded here and uploaded via System -> Maintenance -> Upgrade.
Troubleshooting (Incase Upgrade Doesn't work)
- You may have to upgrade to an intermediate firmware first if the firmware starts with 2.0.0. You can download that here. This isn't necessary for devices running 2.0.1.
- If you are still unable to upgrade straight to the newest firmware, try this firmware as a step between.
Local Configuration:
We will start by setting up our access point.

Navigate to Wireless -> Radio #1: 60GHz, enable 5GHz Backup, set the SSID to a name of your choice, enable encryption, and set the encryption key to a password of your choice.

Next, repeat the process for Radio #0, copying the settings above while using your own SSID and password.

Within Network -> Internet Settings, I recommend changing the fallback IP address. Each unit should have a different fallback IP.

Within System -> System Settings, I recommend changing the hostname. Include either AP or ST followed by the location of the unit to help avoid any confusion later on.

In System -> User Accounts, I recommend changing the default password. If you wish to create a different username, you can add a new account and set a username and password, then disable the ‘root’ account.
Now We Can Configure the Station:
Make sure to unplug the LAN connection from the access point, while keeping its power on.
Next, repeat the initial steps until you reach this screen.

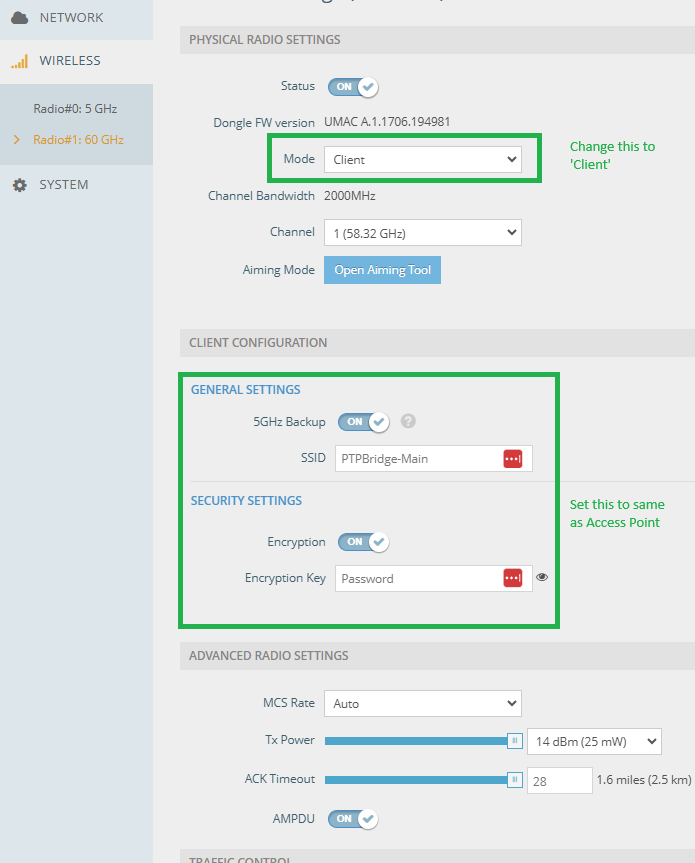
Navigate to Wireless -> Radio #1, set the mode to Client, and ensure that the general and security settings match those of the access point.

Next, navigate to Wireless -> Radio #0, set the mode to Client (WDS), and ensure that the general and security settings are the same as those of the access points.
Then, set the Network -> Internet Settings with a different fallback IP than that of the access point, and change the hostname and password as previously shown.
To Verify That the Link is Active:
You can navigate to Dashboard -> Wireless Status and check the status of Wireless Radio #1.

Here, you can see that the data rate is 2310Mbps, indicating a solid connection.